Monday, February 15, 2016

Brewery Upgrade!!!


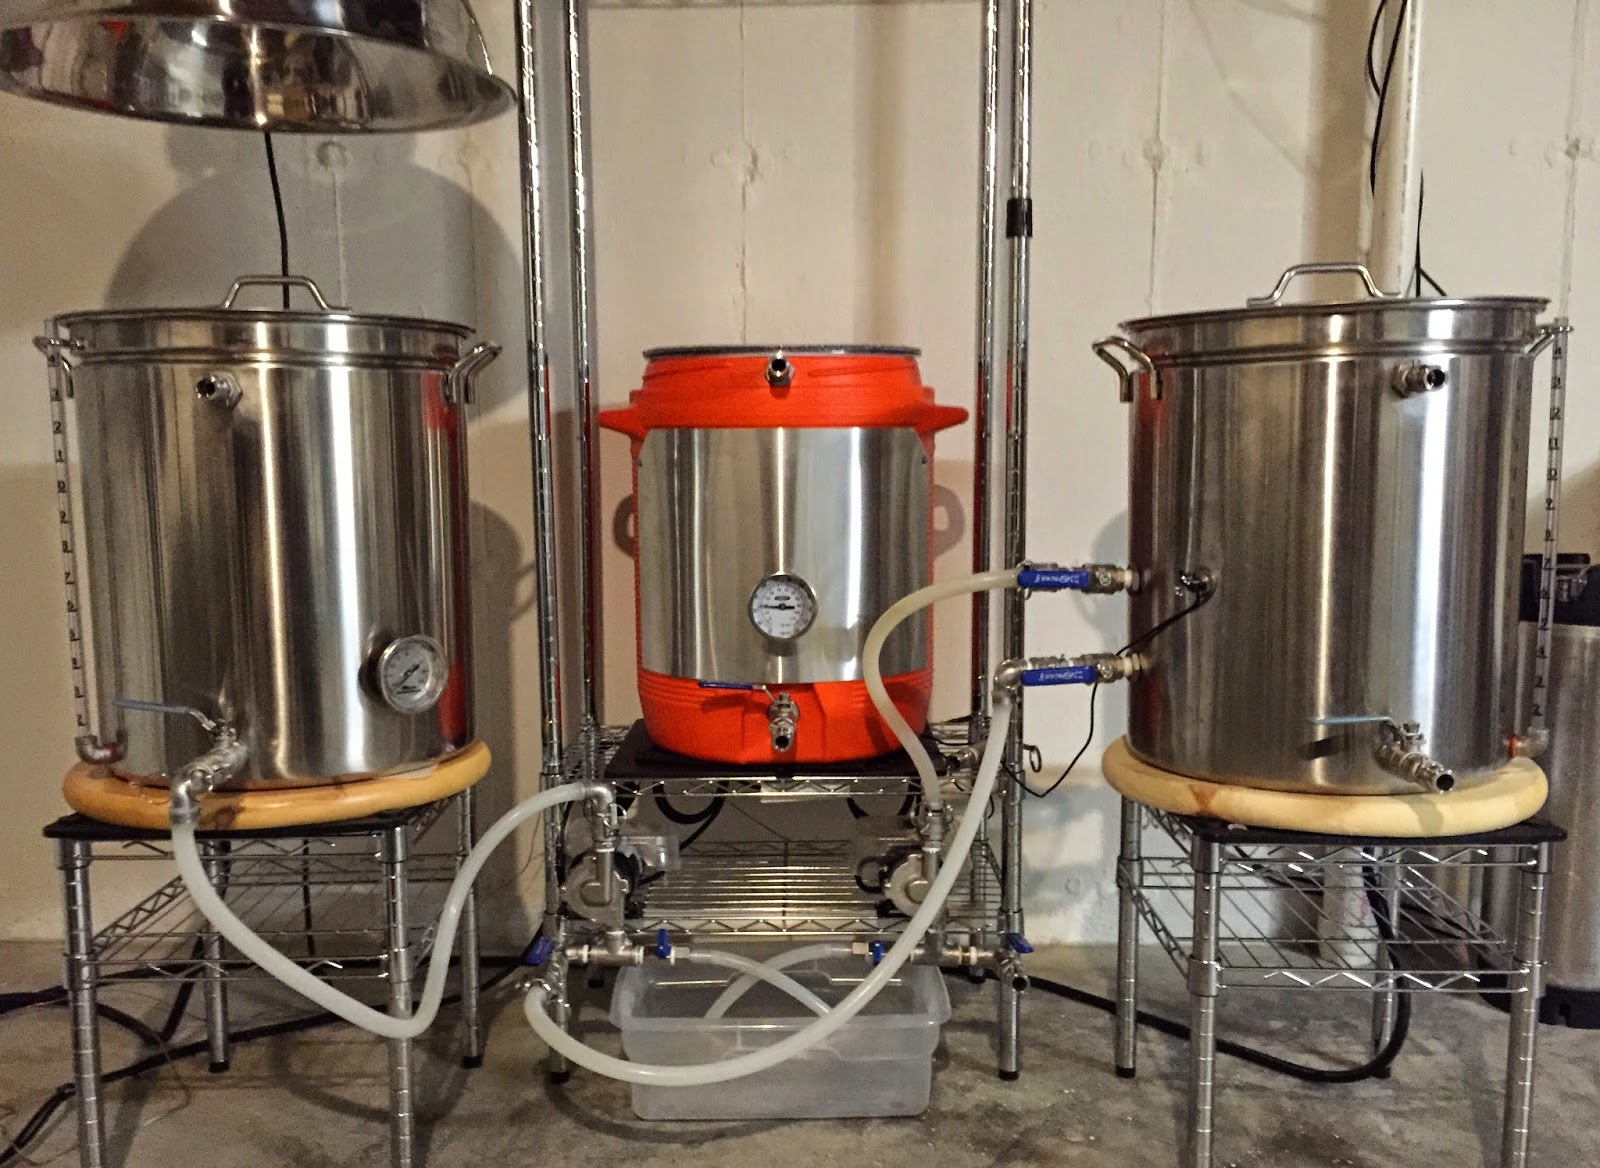
I made a big change to my brew rig!  The stainless tank in the center is a SS Brewtech  20 gallon infusion mash tun!  The highlights are that it is fully insulated (including the lid), has cupped bottom with a center bottom drain, a nanometer (which I will explain below) and a re-circulation port which is unfortunately on the wrong side for my system.    I also fine tuned my pump and hose layout to make the whole thing easier to manage.

Why the new mash tun?
  • The volume of the 10 gallon cooler was not big enough to make 10 gallon batches of higher gravity beers.
  • Although I have been assured that using a plastic mash tun is safe, I still feel better having a fully stainless system.
  • It will lend itself to doing more no-sparge brewing due to it's volume.
  • The bottom drain design eliminates wort loss below the false bottom.
  • The nanometer is a great tool to help prevent a stuck sparge or re-circulation.
 What is a nanometer and how does it work?  The nanometer is basically two sight glasses mounted side by side.  One is connected above the false bottom and the other one is below.  As you are recirculating or sparging, the levels in these tubes should remain the same unless a suction is produced below the false bottom which will cause the level in the bottom mounted tube to get lower and lower.  Suction in the bottom indicates that not enough liquid is able to make it through the grain bed and that the re-circulation/sparge pump should be slowed.  Without this indicator the grain bed can be allowed to completely lock up forcing you to stir the the grain and losing any bed filter that had built up.  It is especially bad if you are sparging, because you must stir, go back to re-circulation/vorlauf, then back to sparging again...

The only two drawbacks to this mash tun for me are emptying/cleaning and the location of the re-circulation port.  For emptying/cleaning, my plan is to clean it in place (CIP) the same way that I clean the other kettles.  I am hoping that I can scoop out all the grain and by swirling rinse water to suspend the remaining grain, then pump it into the sink.  At this point I would just use my DIY CIP head to do the same cleaning I do on the other kettles. (More to come on the DIY CIP head in a later post.)

The other change was to eliminate the elaborate pump priming hardware that I originally installed.  This consisted of a T connector coming out of the pump with one side going to the output destination and the other side to a valve and hose allowing me to eliminate back pressure when priming.  Although this worked well, it caused big headaches for cleaning.  As the PBW circulated through the pump and hose half the output T and the valve were not being exposed, which caused sediment to build up.  My solution was simply to eliminate the T and disconnect the output hose from it's destination connector when priming which eliminates any back pressure.  I tested this on my last brew and it worked very well and made cleaning much easier.


Monday, February 1, 2016

Rusty Irish Red 1/31/15

The first batch of Rusty Irish Red is now in the Fermenter.  I had a few problems with the recirculation sticking but once I slowed it to a trickle it seemed to be fine.  I have never had to run it that slow.  Even with the problems, the mash efficiency was still a little over 95%.  I am back to sparging with this batch and it seems to have worked well.  I detected no off flavors with the wort.  One thing I need to add to my procedure is a whirlpool after chilling the wort.  The whirlpool during chilling does not seem to be separating much of the hot/cold break.

Update *** 2/9/16

The OG came out a bit higher than I was shooting for at 1.050 which should push the ABV to a little over 5%.  After 2 days I was kind of freaking out that the air lock was not bubbling so I attempted to tighten the lid a bit.  I was easily able to screw and unscrew it and it was not making a squeak from the silicone gasket.  That is when I discovered that the gasket had fallen into the fermenter!  I fortunately had a spare gasket that I sanitized and put in place.  Needless to say the air lock went totally crazy!  After a full 5 days I emptied the yeast catcher and there was enough yeast in the cone to fill it again.  I plan to dump again at the 10 day mark and count that as the beginning of secondary.  I plan to secondary for about 2 weeks before kegging.

Infection!!! (Maybe....)

The 5 Kilowatt Blond is infected!  I think I have narrowed the problem down to a problem with the keg.  The previous beer that I had in that keg (Rusty Irish Red) was infected as well.  I am not sure what is going on because before I used this keg for the Blonde I totally disassembled it, cleaned all the parts with hot PBW, rinsed, re assembled, rinsed again, filled it with StarSan, let it stand for 2 hours,  forced out all the StarSan with CO2, and left the thing pressurized until I was ready to fill it.  All the seals on this particular keg were replaced in October and each time I clean it I pay special attention to them to make sure they get cleaned and soaked for a long time in StarSan.  The only thing I can think of is if the dip tube has an infection inside that I have not gotten cleaned out.  I am not even sure what kind of tool you would use.  I guess a very small bottle brush...

*** Update ***

Someone on HomeBrewTalk.com suggested using a hydration line cleaning brush.  I found one on amazon.  Looks like that might just fix my problem!

*** Update  (2/9/16)

Ok.... after being in the keg for another week and a half I am wondering if the off taste is actually yeast and sediment.  The beer is now crystal clear and although the citris taste from the Citra hops is very pronounced on the back end it no longer tastes sour to me....  I am going to have some others taste it to see if I am crazy.

 *** Update (2/15/16)

It is clear at this point that there is no infection and that adding .75 oz of Citra in the last 10 minutes of the boil had a BIG effect on the beer.  The flavor no longer has a sour taste but a slightly tart citrus flavor in the finish.  The beer is now crystal clear has a very strong long lasting head and the nose is definitely more pronounced.   

Friday, January 29, 2016

To Sparge or Not to Sparge.....

I was convinced after tasting the pre-fermentation wort for my 5-Kilowatt Blonde No-Sparge batch that this technique would help me further reduce the chance of astringency in my beer.  I was wrong. Don't get me wrong, most people would not even notice it but due to my on going battle with this issue I am hyper sensitive to it....  That being said, the English Pale ale I made before this using my standard fly sparging actually was less astringent.   Sooooo.... considering that it may have only saved me about 10 minutes of my brew day, I think I am going back to sparging.

*** Update (2/15/16)

After a bit more time, any astringency is completely gone.  The beer is now crystal clear!  Will I try another no-sparge batch?  Most definitely!   10 minutes is 10 minutes...... Besides, now that I have the giant mash tun it should be even easier.


Monday, January 25, 2016

Wee Heavy - Northern Brewer All Grain Kit

On December 15 I brewed the Northern Brewer Wee Heavy all grain kit.  Everything went as expected except for the fact that I apparently got my water chemistry under control and my efficiency went through the roof coming out at about 96%!  The highest I have ever gotten on this system was about 70 so friends....  WATER MATTERS or at least PH does...  My OG was 1.098 when the estimate was 1.083.  Using the FastFerment I had the ability to dump yeast and did so twice in the first 2 weeks.  When I hit the 4th week the yeast catcher was only half full and had been at about that level for over a week, so I took the opportunity when dumping to check the gravity.....  I found that the fermentation was stuck at about 1.031!  After a bit of reading I decided to pitch another package of yeast.  I am now going to give it another 2 weeks and then keg.  I have noticed about a quarter inch of yeast cake in the catcher since I pitched (about 5 days ago) so I am guessing something is happening slowly.  There is definitely no visible bubbling in the airlock.

*** Update (2/9/16)

The FG came out at 1.025 putting ABV at about 9.7%  The Wee Heavy I made last year came out at about 8.5%.  It is now kegged and should be carbed up by Wednesday 2/10.

No Sparge - 5 Kilowatt Blonde


**** Updated ****

Sunday the 10th I brewed my first no-sparge test batch of 5 Kilowatt Blonde!  It was a simple recipe with 9 lbs of pale 2-Row and 1 lb C20.  I hopped with Citra  at 60 minutes with .25 oz and at 10 minutes with .75 oz. I wanted some body so I mashed at 156 and did a 10 minute mash out at 168.  The efficiency was at 90% so I am not sure I will EVER sparge again unless I don't have room in the mash tun.  Even with the small grain bill in this recipe I still didn't have enough room to get the 8 gallons I need to do a full 1 hour boil, so I saved a gallon or so of the HLT water to top up prior to the boil.  This seemed to work well. My OG was on target and it kegged at 4.59% abv which was about what I was looking for.  I couldn't detect any off flavors pre-carbonation but on the next batch I may add the last of the Citra at the 15 minute mark to bring up the IBU's a little. The beer seems to have cleared up well!  Can't wait to see what it looks like after cold conditioning for a few days.  I may also cut back on the C20 a bit to bring down the color a bit.  It should be all carbed up by Wednesday evening.  I will post a pic with tasting notes then.


Well it is mostly carb'd up and doesn't taste too bad IMHO!  You can catch a little bit of citrus nose on the first sip but not much after.  The head is not as strong as I would like but may get better after being on the gas a bit longer.  The flavor has medium to low citrus a LOT of body and just a tiny hint of astringency in the finish.  The color is a bid darker than I would have wanted due to my increasing the amount of C20 at the last minute.   It still needs some time to settle out but the flavor profile is about what I expected.   I am really wanting a lighter color, a little less body, a little more hop flavor and a lot more hop aroma.  The color in this pic is a little misleading due to the lighting.  The beer is actually significantly lighter.  Things I am going to change in the next batch will be:  1) Trade 1/2 pound of C20 for an extra pound of pale 2-row.  2) change the Citra hop schedule to (.25 for 60), (.5 for 20) and (.25 for 10 minutes after flame out).  3)  mash at 153 instead of 156.  4)  add a dose of PH5.2 stabilizer to the mash to eliminate ALL astringency.

Tuesday, January 12, 2016

No Sparge Brewing...?!?!

This past weekend I tried a technique called no-sparge brewing in an effort to shorten and simply my brew day.  You do this by mashing with the total amount of water necessary to obtain your full pre-boil volume.   This technique is definitely nothing new to the brew-in-a-bag folks as they have always done it this way.  The main drawback to no-sparge seems to be about a 10% drop in efficiency making it necessary to use a bit more grain to achieve your target OG.  Beings I have a HERMS system I decided to go ahead and use it to maintain temperature and recirculate during the entire mash and mash-out.  The results were way beyond my expectations!  My mash efficiency came out at 90%!!!  I will definitely continue to use this technique on small session beers that require less than 12 lbs of grain.  If I had something like this I would be able to do all my beers this way!

CFC Upgrade


Near the center of this picture is my latest addition to the brewery.  It is called a convoluted counterflow chiller.  It is made up of a 1/2 inch copper tube that has been slightly crimped in several places down it's entire length then slightly twisted.  It is then placed inside a 7/8 inch tube and the whole thing is bent into a coil.  The two pipes are sealed from one an other and fittings are attached to allow water to flow in one direction through the bigger pipe while wort travels the opposite direction through the center pipe.  It works in a similar way to a plate chiller but the path for the wort is much larger and has nothing for particles to hang up on making it extremely easy to keep clean.  The other great thing about this chiller is that it is EXTREMELY efficient!  At my last brew day I brought 6 gallons of wort from boiling to 65 degrees in about 9 minutes!  Most people use these for single pass chilling from the boil kettle directly into the fermenter.  I currently have it set up to recirculate the boil kettle so that a whirlpool is formed as the wort chills.  This helps separate the hot and cold break before transfer.  So far I am very happy with my purchase!

RO Water Update


Pictured above is the float valve assembly I came up with for filling my HLT with RO water.  Filling the kettle can take up to 8 hours so I wanted a way that I could leave it and not worry about it over flowing.  I have been using RO water in conjunction with Burton Water Salts for my last 4 beers and I can safely say that between this change and sparging a little less the astringency problem I was having is completely gone!  Another thing that I found is that with the proper water chemistry my mash efficiency has gone from 60-70% all the way up to 90-95%!!! 

Plastic Conical Temperature Control

Cooling - My primary goal is to simply maintain ale fermentation temps (as close to 68 degrees F. as possible) on a per vessel basis.  Because of the shape and size it is difficult to use traditional means for cooling.  It would take a VERY large fridge/freezer to house them which would eat up a LOT of space in my basement.  As an experiment I purchased 25 feet of bendable copper tube and made a coil that fits tightly around the largest part of the conical.  At this point there are small stainless bolts on either side that can be used to hang the fermenter from a wall bracket.  These bolts hold the copper coil in place about 1/2 inch below the 5.5 gallon mark.  I then connected one end of the coil to a submersible pump that I placed into a 5 gallon cylindrical drink cooler.  After routing the other end of the coil into the top of the cooler I put about 3 gallons of water in the cooler along with 3 frozen 1 liter bottles of water.  By hooking the pump power cord to my home made temperature controller I can have the pump kick on any time the temperature in the fermenter goes above a set point.   I tested this by filling the fermenter with 5.5 gallons of 80 degree water and setting the controller to 70 degrees.   Within 45 minutes the temperature in the fermenter came down about 6 degrees.  I felt this was promising so I tried the test again starting with 75 degree water and putting some bubble wrap insulation around the coils and foam around the hoses going from the cooler to the coil.  This test was even better as I was able to bring the temp down to 68 degrees in about 20 minutes.  It really helps that in my basement where the fermenters are kept the ambient temp is about 66 degrees year round.   I doubt this solution will work well for lagers but I think it will work really well for ales.  I plan to keep the unit on the fermenter for about the first week during the most active part of the fermentation.  After that it would be freed up for use on the other one.

Heating - My goal in this has two parts:  1) keep the temperature up if there is a cold snap and the basement gets below 55 degrees.  2)  allow me to do a controlled warm up to 72 or so for different fermentation profiles.  To accomplish this I ordered a Brew Belt which is simply a 110v 800 watt strap that you can wrap around the fermenter and connects to itself like a belt.  Connecting it to the heating plug on my controller should allow me to maintain a temperature above ambient up to 75 degrees or so.  I have not received it yet but will post my tests.

Plastic Conical - Update!

I liked the FastFerment conical so well that I purchased a second one!   I would recommend these to anyone with two minor warnings:  1) They do not seal well.  To get them to seal I first tried lightly sanding the top with a big flat sanding block which helped a little, then I simply added a second gasket which fixed the problem.  When I bought the second one I just automatically ordered an extra gasket.  2)  You must disassemble them to get them completely clean.  The second time I used the first one I simply wiped it out with a soft sponge, sprayed it out with 180 degree PBW, rinsed twice thoroughly and sanitized by putting a gallon of properly prepared StarSan in it and shaking it up with it sealed.   Upon tasting before it went in the keg I could detect a slight tartness that continued to get worse after it was in the keg for a few weeks.  When I did the next beer in the first conical I did the standard cleaning above then removed both the ball valve and the thermowell, cleaned them with a brush and sanitized them by soaking them for 20 minutes in StarSan before putting them back on the fermenter.  This seems to have solved the problem and I have not had bugs in either fermenter since.

Tuesday, May 12, 2015

Plastic Conical!


After struggling with racking my last brew to secondary and talking to the guys at St. Louis Wine and Beer Making,  I decided to risk $140 on the FastFerment conical.  It should eliminate racking to secondary and make yeast reuse a lot easier. I also have a plan to make kegging easier.  I am going to  mount a cheap boat winch and pulley to the basement support pole and beam respectively, allowing me to lift the conical out of its stand and gravity feed into the keg. It has mounting bolts on either side above the balancing point that will work great for attaching a cross chain and in turn the winch cable.  Another bonus is that FastFerment will soon be introducing an insulated wrap that you can pump cold water through to control temperature!  I would just have to add a pump and my temperature controller to get the same effect as an expensive jacked setup.

Fixing Acrid Aftertaste (RO water)


Every brew that I have done on the electric system, other than the porter, has had a very pronounced acrid after taste.  You take a drink and think, this is GREAT, then right as you swallow you get hit by this taste that I can only describe as over cooked super strong black tea.  After some research I came to the conclusion that my mash is suffering from high residual alkalinity.  I never obtained a water report but I know from seeing extreme scale build up on water faucets that our water is EXTREMELY hard.  All along I have been using PH 5.2 stabilizer but apparently it was not able to lower the PH that much.  My experiment of using Potassium chloride softened water to dilute by half also had no effect.  In fact, the American Wheat I made was even worse.  At this point I decided that I was not going to waste any more beer or time experimenting and I installed an RO water system.  Rather than trying the dilution trick again I decided to simply use all RO water and just build a balanced water from scratch.  I am planning a brew day for Sunday the 24th where I plan to brew a NB English Pale Ale.  I will be using Burton Water Salts from LC Carlson to approximate the Burton on Trent water profile.  I will also make sure to have precision PH test strips and gypsum at the ready just in case.  What I am not sure about is if I will use the PH 5.2 stabilizer.  After doing some forum research I discovered that most people recommend not buying it and if you have already bought it, through it away.....

Monday, April 20, 2015

Updates and Mash Efficiency

I have completed the 3rd 5 gallon brew on the electric brewhouse!  Here is what I have learned so far:

1)  Always make sure your hydrometer/reflectometer is calebrated!!!  Failure to do this has caused me an enormous amount of stress.  On my last two brews I relied on a borrowed reflectometer to take my gravity readings and calculate my mash efficiency.  On the second one (American wheat), there is no doubt that I had problems with the grain bed so I chalked the low numbers up to that.  On the third (vanilla porter) the numbers were also low but I had no grain bed issues.  This prompted me to double check using my trusty (mostly calibrated) hydromenter.  Turns out the reflectometer was low by .013!

2) There is not enough drop between my brew vessels and my pumps.  I am not sure why but while making the vanilla porter, I had several instances of my pumps not priming properly.   This was so frustrating that my head nearly exploded.  This situation caused me to loose more than 1 quart of very concentrated wart while tying to get the pump primed.  It also caused me to have problems with chilling down the wort.  I did not realize that the pump was not primed and I ran it dry for quite some time.  It is a wonder I didn't burn it up!  As a solution I plan to elevate my mash tun by about 2 inches, lower the pumps by 2 inches and do a flip/swap of the pump heads so that the input is once again on the bottom.  In this configuration I have never had my pumps fail to prime.

3) It is important to only use the amount of sparge water necessary to get the boil volume you need.  On my last 3 brews I figured that I had plenty of sparge water so I could just keep adding it until I get the proper boil volume.   WRONG!  The extra water is apparently diluting the run off so that there is a lot of sugar left floating in the MLT when the run off reaches volume.  I am hoping that fixing this problem will increase my mash efficiency by quite a bit...

Efficiency!

I need to brew a few more batches to be sure but it looks like my mash efficiency is coming out at about 82%!!!  Not too bad!!!   It may even turn out to be a bit higher once I figure out what my flow rate needs to be on the HERMS side.  I know it was definitely to high on the American wheat due to the fishers that formed in the grain bed and to low on the vanilla porter because the efficiency was down a bit.  As I said above I also plan to calculate my sparge water volume and stick to it!

4/20/15 Northern Brewer Dry Dock URCA Vanilla Porter - 5Gal - UPDATED!

Recipe Data

Date:  4/19/15

Type of beer: Dry Dock URCA Vanilla Porter

Recipe Author:  Northern Brewer

Batch Size:  5gal

Yeast:  Wyeast #1056 American Ale Yeast.

Sacch' Rest: 156 for 60 min

Mashout: 168 for 10 min

OG at 75% efficiency:  1.061

Fermentation Temperature:   65-70 F

________________________________________


Brew Day Data


Starter: 1 liter 70grams light DME 36 hrs stir plate
             Stopped stir plate after 24 hrs
             (used temp controller with heater and fan)

Sacch' Rest: 50 min @ 156
                     15 min raising to mashout temp
Mash-Out:   10 min 168
Sparge:         60 min 165

Pre-Boil Gravity:    1.046

Pre-Boil Volume:    7 gal

Mash Efficiency:   75.4%

Realized OG:  1.060

Actual Post Boil Batch:  5 gal

Pitch Temperature: 68

Yeast Nutrient:  2.5 tbs

Notes:  While adding grain I lost about 6 oz to the floor so the actual mash efficiency was most likely just a bit higher.  I also lost several ounces of highly concentrated wort trying to get the recirculation pump primed.  On this batch I ran the recirculation at a VERY slow rate.  I am thinking it may have been a little two slow...  I love the new recirculation kit from Brew Hardware.

____________________________________________ 


Fermentation Data

No thermowell on this batch so no detailed temperature info.

After 9 hours there was heavy activity in the air lock and there is a very slight brown tint to the liquid in the air lock.  This leads me to believe that there was really heavy activity over night.  The basement temp is about 64 degrees and I made no attempt with this batch to heat or cool it.  I am hoping that by pitching below 168 degrees will keep the overall temp in the fermenter in a reasonable.  It must have been really crazy at some point during the night because there is at least 5 inches of head space in the brew bucket.

After 34 hours the activity is still pretty strong but there is no head of foam on top of the airlock.

The fermentation died off to a bubble every minute or so the evening of the 22nd (about 3 days)

As per the instructions from NB I did not rack to secondary until Sunday May the 3rd.  The smell was great and the taste was even better.  There was no sign of the off taste from PH being too high in the mash.  I am guessing this is because of the amount of dark grain in the grain bill.

Monday May the 11th I cut up the Vanilla beans and put them in the secondary.  I was not sure how to handle sanitation so I just soaked the package, scissors and my hands in sanitizer before cutting.  I opened the fermenter lid just enough to dump the bag, then quickly sealed it.

I am scheduled to keg and start carbonation on the 18th.


Tuesday, April 7, 2015

American Wheat Fermentation


A little warm but lots of activity!

Bling for the MLT


Last night while replacing the thermometer on the MLT, I remembered that I had bought a small sheet of polished aluminum to mount to the front of my MLT to bling it up a bit and give me a place to put a cut vinyl sticker of my logo.  I think it makes the old cooler look like it almost belongs along side all the stainless.  To add to the effect I am going to replace the small screws with some short fat lag bolts.  I may also put some on the bottom corners.


Monday, April 6, 2015

4/5/15 Northern Brewer American Wheat - 5gal - UPDATED!

Recipe Data


Date:  4/5/15

Type of beer:  American Wheat 

Recipe Author:  Northern Brewer

Batch Size:  5gal

Yeast:  WLP320 American Hefeweisen

Sacch' Rest: 152 for 60 min

Mashout: 170 for 10 min

OG at 75% efficiency:  1.043

Fermentation Temperature:   65-70 F

________________________________________

Brew Day Data


Starter: 1 liter 70grams light DME 36 hrs stir plate

Sacch' Rest: 10 min 146 (strike temp. too low)
                     50 min 152
Mash-Out:   10 min 168
Sparge:         35 min 170

Pre-Boil Gravity:    1.036

Pre-Boil Volume:    6.6 gal

Mash Efficiency:   80.27!!

Realized OG:  1.050

Actual Post Boil Batch:  4.5 gal

Pitch Temperature: 70

Yeast Nutrient:  2.5 tbs

Notes:  Sunken recirculation hose and to fast recirculation and sparge caused fishers. UPDATE*  the reflectometer was off by .013.  Instead of the OG being low it was a bit more than expected.  I would not have had to boil as long as I did to bring up the gravity.

____________________________________________ 

Fermentation Data

Initial Thermowell Temperature:  70 F
Ambient temp was about 69 from heaters and brewing

4   Hours Thermowell Temperature:  73 F  (No Airlock Activity)
Ambient temp was about 67 and falling

12 Hours Thermowell Temperature:  71.6 F (Slight Airlock Activity)
Ambient temp was about 65 and falling

30 Hours Thermowell Temperature:  69.8 F  (Extreme Airlock Activity)
Ambient temp was about 63.

38 Hours Thermowell Temperature:  66.8 F  (Low Airlock Activity)
Ambient temp was about 63

After 15 days in the fermenter I the FG was 1.000 which gives me a ABV of 6.56!

The beer was EXTREMELY clear.  I plan to give it about 5 days to carbonate at about 45 degrees. I will set up the carbonation tonight.


Using the thermowell really opened my eyes!  The yeast activity really kept the temperature up.  Last night at about the 26 hour mark I put a small fan blowing on the base of the fermenter and the temperature began to fall within a few minutes.  My guess is that the air was stratifying around the bucket causing heat build up.  I know what to do next time...  I hope the time the fermentation was above 70 degrees did not cause too much ester production.

UPDATE!!!!

Turns out that the reflectometer  I was using was consistently low by .013!!!  I am changing the Data above to reflect this. 


First Brew with New Coil!

Sunday April 5th was my first brew day using the new HERMS coil.  I did a Norther Brewer American Wheat kit.  I picked this kit because I wanted to try a wheat beer and also because of the simple grain bill for calculating efficiency.  The coil worked as expected but my first solo brew day brought to light some issues:
  1. The MLT must be preheated.  I am guessing that with my previous outdoor brews the temperature was warmer which negated the need.  This time it caused me to come out low.  The initial temperature came out at about 146 instead of 152.  It took nearly 10 minutes of recirculation to bring it up to where it should have been. I plan to go about 6 degrees over in the future and stir it with the lid off until it reaches temperature. 
  2. I still can not see into the MLT to place the recirculation hose properly.  Due to this and my unfamiliarity with the new high flow fittings, I managed to allow tunneling in the grain bed which brought my pre-boil mash efficiency down to 53 %!  The bad part is that I was not checking gravity readings in the boil kettle until it was too late. It also turns out that I did not have enough DME to make up the difference... When I pulled the MLT to empty and clean it, I discovered that the recirculation hose end was nearly half way buried in the grain bed.   To solve these issues I am going to purchase a clamp on mirror for the racking above the MLT and also will replace the hose with the recirculating mash kit from brewhardware.com. 
  3. Recirculation must be done much slower.  After examining the grain bed during clean up it appeared that there were fishers caused from putting too much pull from the bottom side.  I plan to run at about 20% valve open next time.  
  4. I did not account for the extra volume required for the new coil and the loss that occurred when I was connecting hoses.  This caused me to under estimate the amount of sparge water required. I kind of freaked when I was within .5 gallons of completing the sparge and the pump ran dry....
  5. The body thermometer in the MLT seems to stick.  Flicking on the glass sometimes fixes the problem, sometimes not.  I plan to calibrate my spare and replace it. 
  6. Even though I slowed my sparge considerably, it still only took about 35 minutes.  I am sure this did not help my efficiency and may have contributed to pulling the recirculation hose down into the grain bed.  Next time I know what to expect and will do a better job timing this process. 
  7. It is VERY difficult to control the flow from the pumps using the ball valves.  When sparging I had the output pump set with the valve open by about 10% but the flow was apparently still to strong and the sparge ended about 20 minutes too soon!  I am going to take the advice I found in an online forum and start with the valve completely closed and move it about 1 degree at a time until I get a trickle in the boil kettle.
  8. Even though the basement stays around 64 degrees , once the 70 degree wort was in the fermenter and pitched, the temperature very quickly went up to about 73.  I am guessing this was due to yeast activity.  I had never noticed this before because I had no way to directly monitor the internal fermenter temperature.  With the new thermowell and controller it is easy.  I now know that I need to bring the wort down to a maximum of 65 degrees before pitching.
  9. I need about 25 lbs of ice to quickly cool the wort.  I had about 10 pounds and three small frozen water bottles.  This was not enough so I had to drain off 2/3 of the HLT water and refill with cold water from the sink.  Still I was only able to get it down to about 70 including the 20 minutes I let it settle out after the whirlpool.
Things that went well:
  1. After reading quite a bit about water profiles I decided to use 1/3 filtered un-softened water.  I have not had a water test done but I know for a fact that our local water is extremely hard.  I know this because I once decided to brew with filtered un-softened tap water.  The result was so many deposits on the equipment, especially the boil kettle, that it took me a whole day to clean it all.   Rather than adding water salts back in to completely softened water, I thought this might be a good option.  We will see how it affects the beer but I do know that there were no deposits on my elements or the kettles.
  2. I now know for sure that my boil-off rate when running the element at 80% is about 16% per hour.  In my previous tests I changed the setting a lot to try and find a boil level I was comfortable with.  Now I have a good base.
  3. The MLT temperature held steady during the entire mash with only about .5 degree variance once I got everything dialed.  A 3.5 degree higher temperature in the HLT seems to be perfect.  Because my temperature controller does not allow less than 1 degree changes I will have to make the decision for the individual brew if I want it to be .5 above or below my mark.
  4. It took about 15 minutes using the coil to bring the MLT up to mash-out at 168 degrees.  I learned that it is best to just set the HLT temperature controller to 175 and leave it.  It seems that the heat exchanger looses a bit if efficiency as the temperatures get higher so 7 degrees is not too much.  I plan next time to simply leave the lid off the HLT while rigging for sparge and adding a little ice to it if necessary to bring it down to 170 before starting.
  5. The whirlpool seemed to work great.  The hot and cold break along with the Irish Moss collected in a nice cone in the middle of the boil kettle.

When I checked the fermenter this morning it was gently bubbling.  I am hoping that by this evening it will be in full swing and the ambient temp in my basement brings the temperature down a couple degrees....


Tuesday, March 31, 2015

Coil Test Results

Getting the coil connections leak free was much more difficult than I thought it would be.  Twice I tried to tighten up the top compression fitting to stop a drip and just couldn't get enough leverage on the wrenches to turn the nut more than 1/16th of an inch.  I finally removed the coil and did the tightening outside the kettle.  After finally getting it all put back together, no leaks!  The performance of the coil was similar with respect to temperature transfer.  The maximum gain in temperature I could coax out was 3 degrees and I will still need to keep my HLT approximately 3 degrees above my mash temperature.  One big advantage of the upgrade is that due to the low position of the coil I only have to add a small amount of cold water to cool the HLT after dough-in instead of adding 4 gallons to cover the coils then raising the temperature again.  Another is that I have better control of the temperature of the wort as it leaves the coil by using the output ball valve of the pump.  With the old small diameter coil tubing the flow was very restricted which is why I nearly always got a 3 degree gain.  Now with the flow wide open the gain is only about one degree.  By closing the valve I can increase the gain! 

I also did a mash-out test.  I increased the temperature of the thermo-controler to 175 and adjusted the ball valve to about 15%.  With this combination I was able to bring 6.5 gallons of water in the mash tun from 153 to 168 in approximately 10 minutes.  My plan during an actual brew would be to lower the controller to 170 when the MLT reaches 166 and open the valve to full with the lid off the HLT.  I would then let mash-out recirculate for another 5 minutes before rigging the system of sparging.  The temperature in the HLT should continue to rise up to about 170.